How to Remove eSIM from iPhone: Your Quick Fix Guide
Table of Contents
Discover How You Can Delete eSIM iPhone Swiftly #
Stumped by technology again, are we? Don’t worry, we’ve got you covered! This time, we’re diving into the world of eSIMs, more specifically, we’re going to address the concern: how to remove eSIM from iPhone. Sounds complicated? Believe us, it’s simpler than you think!
An eSIM, or ‘Embedded Subscriber Identity Module’, is a tiny chip inside your phone that acts just like a SIM card. It’s a small component making a big wave in the realm of telecommunication, but like any other innovation, it comes with its own set of hiccups. At times, for various reasons, you may find yourself needing to delete eSIM iPhone.
Why would anyone need to do that, you might ask? Could be for a plethora of reasons! Maybe you’re switching to another network or perhaps, you just want to remove that extra clutter and revert to a physical SIM. Whatever the cause might be, we understand your concern and that’s exactly what we aim to address in this article.
Now, why should you invest your precious time in our guide? Well, the answer is simple. We believe in breaking down complex processes into manageable bite-sized steps. And this guide on how to remove eSIM from an iPhone does exactly that. Whether you’re a tech newbie or a gadget guru, our guide will lead you by the hand, ensuring a smooth, hassle-free experience.
So, what’s in store for you? We’ve compiled a comprehensive guide that will take you through each step of the process to delete the eSIM iPhone. It’s not just a bland, technical manual though. We’ve spiced it up with troubleshooting tips, a dash of best practices and seasoned it with some precautionary measures for a truly complete guide.
Intrigued? We thought you would be. So, let’s not keep you waiting any longer. Scroll down and let’s embark on this journey together. By the end, you’ll be able to navigate the world of eSIMs with the utmost confidence! Ready? Let’s dive in!
Introduction to eSIM Technology in iPhones #
In this section, we dive deep into eSIM technology, and understand its influence on iPhones, and why one might need to know how to remove eSIM from iPhone. Let’s break it down.
What is an eSIM? #
An eSIM, short for ‘Embedded Subscriber Identity Module’, is essentially a small chip embedded inside your smartphone. Unlike traditional SIM cards, which you physically insert into a device, an eSIM is already built into your phone. No hassle of inserting or removing a tiny chip! Sounds neat, right?
But what if you need to remove or deactivate it? That’s where understanding how to remove eSIM from an iPhone comes into play.
Why iPhones and eSIM? #
Apple has always been a pioneer in embracing innovative technology, and eSIMs are no exception. Starting with the iPhone XS, XR, and XS Max models, Apple introduced the dual SIM feature with one nano-SIM and one eSIM. This marked a significant leap in giving users more flexibility and control over their devices.
The Benefits of eSIMs #
Following are the benefits of an eSim. With an eSIM, you can switch between carriers without the need to replace your SIM card. Going abroad? Simply switch to a local plan. This ease of switchability is a game-changer in cellular technology. Plus, it gives your device the capability to have more than one phone number. Neat, isn’t it?
However, as convenient as eSIMs might be, there are instances when you might need to delete it. Maybe you’re changing phones or troubleshooting network issues. In such cases, knowing how to remove eSIM from an iPhone becomes vital.
How to Remove eSIM from iPhone: A Sneak Peek #
Learning how to remove eSIM from an iPhone isn’t as daunting as it might sound. In the next sections, we will walk you through each step, ensuring you can manage this technology at your fingertips. Stay tuned!
Remember, technology is here to serve us. By understanding it and learning to manage it effectively, we not only make the most of it, but also take control of our digital experiences. So, are you ready to dive deeper into the world of eSIMs? Let’s go!
The Necessity to Remove or Disable eSIM from iPhone #
As we’ve discussed, eSIM technology is innovative and offers a lot of benefits. Yet, there are situations where you may find yourself needing to understand how to remove eSIM from iPhone. Let’s dive into some scenarios that may lead to this requirement.
Switching Devices #
Are you considering upgrading to the latest iPhone model or switching to a different smartphone? In that case, you’ll need to remove your eSIM. Transferring it directly from one phone to another isn’t possible. Hence, knowing how to remove eSIM from an iPhone is the first step before you can add it to your new device.
Network Troubleshooting #
Occasionally, network issues can occur that may require you to delete eSIM iPhone data as part of the troubleshooting process. Sometimes, the easiest way to resolve these issues is to start with a clean slate, meaning, removing your eSIM and re-adding it.
Selling Your iPhone #
If you’re planning to sell your iPhone or give it to someone else, it’s important to delete the eSIM iPhone data. You wouldn’t want the new user to have access to your cellular plan, right? Plus, the new user will likely want to add their own eSIM or physical SIM.
Provider Switch #
Are you contemplating a switch to a provider that doesn’t support eSIM? Or, perhaps you’re traveling to a location where eSIM isn’t supported? Either way, you’ll need to know how to remove eSIM from iPhone and switch to a traditional physical SIM card.
In conclusion, as eSIM technology continues to evolve, understanding how to manage it, including how to remove it, is becoming increasingly important. This knowledge empowers you to take control of your digital experiences and ensures you can adapt to whatever situation arises. We’ll delve into the actual steps of how to remove eSIM from an iPhone in the following section. Stay with us!
Step-by-Step Guide on How to Remove eSIM from iPhone #
Given the reasons for the necessity of learning how to remove eSIM from an iPhone, we now embark on the actual process. For business professionals juggling between devices, managing eSIMs is a vital skill. Let’s break it down into simple, step-by-step instructions.
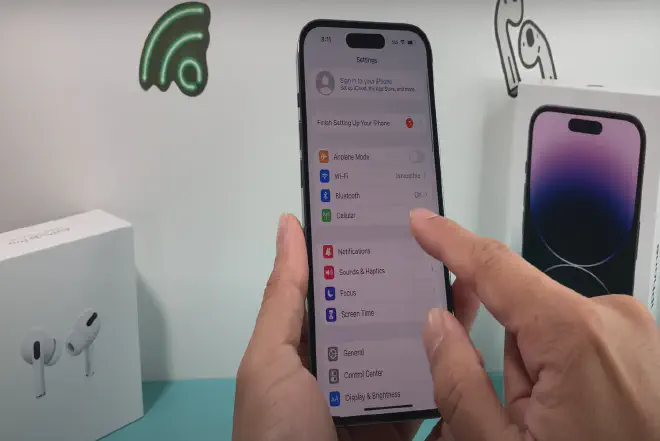
Locate the Cellular Plan #
Firstly, you must locate the cellular plan you want to remove. Go to your iPhone’s Settings, tap on ‘Cellular’, then ‘Cellular Plans’. This step is your initial move towards understanding how to remove eSIM from an iPhone.
Identify the eSIM to Remove #
Your iPhone might have multiple eSIMs. Carefully identify the one you want to remove. The eSIM is typically labeled with the carrier’s name, making it easier to identify.
Remove the eSIM #
Tap on the eSIM label, then scroll down and select ‘Remove Cellular Plan’. A prompt will ask for confirmation. Click ‘Remove’ again to delete eSIM iPhone data.
Confirm the eSIM Removal #
Check whether the eSIM removal process has been successful. Go back to the ‘Cellular’ settings on your iPhone. The removed eSIM should no longer appear under ‘Cellular Plans’.
Add a New eSIM or Physical SIM #
After you’ve mastered how to remove eSIM from an iPhone, you might want to add a new eSIM or a physical SIM. If so, tap ‘Add Cellular Plan’ and follow the on-screen instructions.
Mastering how to remove eSIM from an iPhone isn’t a Herculean task. It’s a simple procedure that empowers you to manage your cellular connectivity better. Stay tuned for more insights on managing modern tech devices.
Troubleshooting Common Issues in eSIM Removal Process #

Even with a clear guide on how to remove eSIM from iPhone, there can be unexpected hitches. This section tackles common issues that may arise during the eSIM removal process, providing effective solutions to keep you moving forward.
eSIM is Not Deleting #
Sometimes, the iPhone might fail to remove the eSIM despite following the steps to delete eSIM iPhone data.
- Make sure your device is updated to the latest iOS version.
- Try restarting your iPhone before repeating the removal process.
Can’t Identify the eSIM to Remove #
Having multiple eSIMs can confuse you when you want to remove a specific one.
- Each eSIM should have a label, typically the carrier’s name.
- If you’re unsure, contact your carrier to verify which eSIM is which.
iPhone Requests for a Carrier Update #
Sometimes, your iPhone might prompt for a carrier update when you try to remove the eSIM.
- If so, connect to Wi-Fi, then go to ‘Settings > General > About’.
- If an update is available, a prompt will appear. Click ‘Update’.
eSIM Still Appears After Removal #
After understanding how to remove eSIM from iPhone and going through the steps, the eSIM might still appear.
- Try restarting your iPhone, then check the ‘Cellular Plans’ again.
Knowing how to troubleshoot common problems during the eSIM removal process is just as important as learning how to remove eSIM from an iPhone. It ensures you’re prepared for any hiccups along the way. With patience and the right steps, you can seamlessly manage your eSIMs.
Best Practices After Removing an eSIM from Your iPhone #
Just as learning how to remove eSIM from iPhone is essential, so are the best practices after the process. These steps will ensure that your device remains secure, efficient, and ready for your next digital SIM.
Ensure Data Security #
Even after you know how to remove eSIM from an iPhone, it’s crucial to guarantee your data security.
- Confirm that your carrier has deactivated your eSIM.
- You can check your mobile data usage in ‘Settings > Cellular’ to ensure no residual data consumption is taking place.
Keep Your iPhone Updated #
Software updates often contain important security enhancements and fixes.
- Regularly update your iPhone to the latest iOS version in ‘Settings > General > Software Update’.
Regularly Backup Your iPhone #
Even after the eSIM is removed, it’s crucial to regularly back up your device to prevent data loss.
- Utilize iCloud or your computer for regular iPhone backups.
Resetting Network Settings #
After understanding how to remove eSIM from an iPhone, resetting network settings is a good step.
- Go to ‘Settings > General > Reset > Reset Network Settings’.
- This process can resolve any lingering connectivity issues post eSIM removal.
By following these best practices after removing an eSIM from your iPhone, you’re setting your device up for a seamless transition. Whether you’re planning to install another eSIM or reverting to a physical SIM card, these steps will keep your iPhone running smoothly and securely.
FAQs on How to Remove eSIM from iPhone #
While understanding how to remove eSIM from an iPhone, certain questions might crop up. This section addresses common queries on the process, helping you maneuver the eSIM journey more confidently.
Can Removing an eSIM Affect My iPhone’s Performance? #
Not at all. Removing an eSIM from your iPhone has no impact on the performance of the device. The eSIM is simply a digital version of the physical SIM card, and its removal or addition doesn’t affect the iPhone’s overall function.
Can I Use My iPhone Without an eSIM? #
Absolutely, yes. Your iPhone can function without an eSIM, given that it has a physical SIM card installed. If both are removed, you’ll only be able to use Wi-Fi for connectivity.
How Do I Know If My eSIM is Successfully Removed? #
Once you follow the steps on how to remove eSIM from an iPhone, you can verify its removal by going to ‘Settings > Cellular’. If the eSIM label is not listed, it means your eSIM has been successfully removed.
Can I Recover My eSIM Once Removed? #
Recovering a removed eSIM is not possible directly from the device. If you need the same eSIM profile, you’ll have to contact your carrier to reissue it.
Does Removing an eSIM Delete My Contacts? #
No, removing an eSIM doesn’t delete your contacts. Contacts on iPhones are stored in iCloud or your device, not on the eSIM or physical SIM card.
Hopefully, this FAQ section clears your doubts regarding how to remove eSIM from an iPhone. Just remember, each step plays a significant role, and following them in order ensures a seamless eSIM removal process.
Conclusion: How to Remove eSIM from iPhone #
To summarize, we’ve taken a comprehensive look at how to remove eSIM from the iPhone. We’ve tackled understanding the technology behind eSIM, its benefits and drawbacks, common issues, and best practices post-removal. We’ve also addressed some frequently asked questions surrounding this process.
Remember, removing an eSIM does not impact your iPhone’s performance and doesn’t delete any saved contacts. It’s a straightforward process that can be quickly done from your device settings, and if you need the same eSIM profile in the future, you can always contact your carrier to reissue it.
We hope that this article has been a helpful guide on how to remove eSIM from iPhone. Please share it with anyone who might find it useful, and let us know if you have any feedback or additional questions. Your experiences will contribute to a better understanding of this technology, and we’re always here to help you navigate the world of eSIMs.
Remember, as technology evolves, so do we. Stay informed, stay connected.